Thankful… for Family and a HEALTHY HOME

Whether you are a new customer of BLUEGRASS CLEANING CO., or have been a client for years, we’d like to take this time to THANK YOU for your business. We know we are not the only game in town when it comes to keeping your home clean and beautiful. To show our appreciation, we’d like to offer you a few quick tips to have a cleaner, healthier home and save you a few bucks too.

The United States Environmental Protection Agency (EPA) study revealed that carpet actually helps to clean out the air in our homes and offices. The carpet acts as a filter, trapping soils, gasses, and pollutants such as pet and human dander, pollen, and even air pollution. This is great news since nearly every home in America has wall-to-wall carpets installed in one or more areas. There are several things that you can do to keep your carpet looking cleaner and help it last longer.

  • Keep soils out by using walk-off mats at entrances and keeping outdoor walkways, stairs, and porches clean.
  • Use doormats at all entrances. Don’t wear street shoes in the house. Avoid going barefoot because body oils get on the carpet and attract dirt.
  • Vacuum often, including upholstery, at least once a week. You should vacuum more often if there are pets or small children in the home, or if anyone suffers from asthma.
  • Promptly attend to any spots or spills. First, blot or scrape up as much of the spill as you can before it dries into the fibers. Then apply a mild spotting agent to the carpet and gently agitate it into the spot with the back of a spoon. Blot with a white towel to absorb the spot and the cleaner. Put a little clear water on the area, agitate again and then blot as dry as possible. If this process doesn’t work, call us.

In addition to controlling soils, vacuuming often, and being attentive to spots and spills, you should include professional cleaning followed by an application of a fiber protective treatment of your carpet.

Periodic professional cleaning is a major part of an effective carpet and air quality maintenance routine, eliminating the contaminants that build up over time. Of course, every household has its own unique combination of factors such as environment, number of occupants, children, pets, and smoking or non-smoking, etc.

Deep cleaning of your carpets assures your carpets are brought back to a fresh, healthy condition. This is good for your health as well as your wallet.

How so? Clean carpet has the ability to trap and hold airborne contaminants out of the breathing zone. In fact, studies have demonstrated that it takes ten times more wind force to dislodge the dry particulate soils that can trigger allergic reactions from carpet than from hard floor surfaces. That’s because carpet traps and holds contaminants until they are removed by vacuuming and cleaning.

Carpets that are regularly maintained will last much longer because it is the dry, gritty particulate soil and old oxidized stains that cause the permanent damage that makes old carpets look dull and dirty.

Regardless of how neat and tidy you are, there comes a time when you need professional carpet cleaning. And don’t forget the floors, rugs, and upholstery will last longer if they are professionally cleaned as well!

Call Bluegrass Cleaning Co. to schedule your next cleaning. You and your family will breathe easier; your carpets, rugs, and upholstery will look better and last longer, and your home will remain healthier.

carpet cleaning, carpets, fiber protector, stains, upholstery

How to Clean and Care for Wood Furniture

How to Clean and Care for Wood Furniture

You love the way that wood furniture looks inside of your home. But what you aren’t as crazy about is how the material gets damaged over the years. Wood furniture, as elegant as it can be, can be more susceptible to damage than other decorations in your home. As time passes, the surfaces can get scratched, scuffed, and stained. You want your wood furniture to last as long as possible. How should you care for and clean it? Take note of these maintenance techniques to preserve your wood furniture:

Pay Attention to Cleaning Labels

Wood needs to be cleaned differently than most other materials. Depending on the species of wood and the coating on its surface, you’ll need to use only certain products to clean it safely. Using the wrong product can do more harm than good.

You might know how to disinfect something like a glass tabletop or leather sofa. But what about wood furniture? Harsh cleaning products might strip the wood and leave it looking worse for wear.

We recommend reading the instructions on any cleaning product you use. Make sure that it’s wood-safe before applying it.

Even if a product is designed for use with wood, test it out on a small area first. If you wipe the surface and nothing is damaged, great! But if you notice any concerning signs, discontinue using it immediately.

Use the Right Cloth

Live edge tables are perfect for serving dinner or snacks. But what about when it comes time to clean them?

Dishrags and washcloths are often too abrasive for the delicate surface of unfinished wood. Instead, stick to cotton or microfiber cloths that are soft and mostly dry. Do you have a sticky spot or stain on the table that won’t budge? Rather than using water or an abrasive cleaner, try to apply more pressure with the cloth first.

When using a cloth, always wipe in the direction of the grain—never against it. If you’re using a cleaning solution, only dampen the cloth slightly. The drier the cloth is, the better. Use a cloth that’s completely dry to remove a surface layer of dust.

Prevent Water & Heat Damage

If you’ve ever dealt with a flood or spilled water on your floors, then you may have needed hardwood floor restoration services. The same thing can happen to your furniture if you use improper cleaning techniques.

Cups can damage the surface of a wooden table. Use coasters under glasses to prevent water rings from forming on the wood. When placing a hot dish or plate on the table, use a protective heat mat underneath it. A large placemat can prevent forks and knives from scratching the surface of the wood.

Your chestnut end table does look beautiful next to the window. But did you know that the sun’s rays can damage its surface? Try to keep wooden furniture out of direct sunlight. If you can’t find another place for it, consider drawing the blinds during the day.

Finally, avoid placing wood furniture next to hot or cold spots in your home. Shifting temperatures may cause it to expand and contract. Store wood away from vents and fireplaces.

Unfinished Wood vs. Wax Finishes

Depending on the type of wood furniture you have, you’ll need to adjust your cleaning routine accordingly.

Is your wood finished with shellac, polyurethane, or varnish? It may have a glossy and reflective coating that’s smooth to the touch. Certain cleaning products can destroy this coating, making the wood look and feel uneven.

The wax coating itself has protective qualities, so you’ll rarely need to apply additional products—doing so may cause the wax to dissolve. If this happens, you may need to re-wax the furniture.

Control Humidity

As the seasons change, so do the ambient temperatures and moisture levels in our homes. But this can have disastrous consequences for wooden furniture.

Any wood furniture that’s stored in the basement, kitchen, or bathroom could be subject to high humidity levels. Not only can this cause the material to expand, but it may even grow mold.

What can you do to keep humidity under control? Installing a dehumidifier can combat the rising moisture levels. You might install a ventilation system to get rid of steam from cooking or showering. If all else fails, consider moving wood furniture to a drier area of your home.

Plastic furniture might be more durable than wood, but it can’t hold a candle to the beauty and character of this material. When years of wear and tear can make the surface of wood furniture look less than impressive, using the above cleaning and maintenance tips will help keep your wood items gorgeous for years to come.

Bluegrass Company
https://www.google.com/maps?cid=1536571363059009812
3323 Wood Valley Ct, Lexington, KY 40502
(859) 888-1515
http://155.138.213.92/

clean wood furniture, Cleaning Tips & Tricks, cleaning wood furniture, How to Clean and Care for Wood Furniture

Do’s and Don’ts: Pet Hair Management

Every pet owner knows there is something they can’t avoid – fur around the home. Regardless of their breed, at one point or another, shed happens. And, having your house covered in pet hair isn’t everyone’s cup of tea. Read on to learn some dos and don’ts of pet hair management to keep your home and pet squeakily clean.

Do’s to Control Fur Around the House

Keeping fur under control is all about getting into a routine. Following grooming appointments, cleaning schedules, and more will help you control hair around the house.

1. Regular Grooms

Start by targeting hair before it even gets to your home. Depending on your pet’s breed, you want to get into a regular grooming schedule with their vet or grooming salon. Most pets need grooming twice or once a month.

2. Add More Baths

Bathing your pet not only removes dirt and unpleasant smells but it can help remove loose fur that would otherwise end up on your floors. Try bathing products formulated to help reduce shedding, and don’t forget to brush before and after bathing.

3. Vacuum Daily

Yes, we know… but a vacuum is the one way to manage pet hair in the house. If you can, vacuum every day to prevent fur buildup. If a traditional vacuum is too much to fit your busy schedule, consider getting an automated vacuum that will handle the work while you work.

4. Keep Pet Hair Removal Tools Handy

Every pet owner has their own set of pet hair removal tools. From lint rollers to duct tape, and hair removal tools, these are must-haves. Keep them close to major areas like the couch and bedroom for quick touch-ups throughout the week and in-between deep-clean sessions.

5. Designate Off-Limit Areas

Finally, you want to keep your pet away from specific areas. For example, if you have a couch with a fabric that catches pet hair, then that’s a designated off-limit area. This won’t help manage all the pet hair around your house, but it will make it easier to control.

Don’ts of Grooming Your Pet

When keeping hair at bay, what you don’t do is equally important. Neglecting or forgetting to do these things can make your pet’s shedding worse.

1. Overbathe Your Pet

Most vets recommend bathing your pet less than most people do. Overbathing can strip them from their skin’s natural oils, which help keep their hair healthy. When you over-bathe your pet, it can cause skin irritation which then leads to more shedding.

2. Try to Vacuum Your Pet’s Hair

It might be tempting to vacuum your pet’s hair but try to avoid this. Not only does the vacuum noise make them uncomfortable, but the suction nips their skin and can cause severe lesions. If you want to use a vacuum, ensure you get a grooming extension designed for this purpose.

3. Use Regular Shampoo

If you bathe your pet at home, try to use a de-shedding shampoo to help get rid of loose fur. Check the formula and find ones designed to help control shedding and maintain their hair in perfect health.

4. Neglect Walks and Exercise

No matter your pet’s size, they need walks and exercise. Plus, when your pet spends more time outdoors, there’s a greater chance that a lot of their loose fur will end up outdoors and not inside your house.

5. Forget About Professional Grooms

Finally, don’t forget about professional grooming sessions. While you might take the time to brush and clean your dog, a professional groomer knows how to deal with the shed. They will use the right products and tools to leave your pet fresh and clean.

Geraldine Orentas is a writer from Happy Writers, Co. in partnership with dog hip harness manufacturer, Walkin’ Pets


Bluegrass Company
https://www.google.com/maps?cid=1536571363059009812
3323 Wood Valley Ct, Lexington, KY 40502
(859) 888-1515
http://155.138.213.92/

Cleaning Tips & Tricks, house cleaning, keeping pet hair at bay, maid services, odor removal, pet hair management

How Often Should You Be Washing Your Linens?

When you think about it, you spend at least eight hours lying on your bed every day. Over time this leads to a buildup of dirt, sweat, dead skin cells, and other grime that collects on your linens. This residue isn’t just gross to think about, but it can also provide the perfect home for dust mites and even trigger health issues like allergies, skin irritation, and acne.

Surprisingly, the average person changes their linens every 24 days. But, when you learn how often you should be washing your sheets, it doesn’t even come close to the standard for proper bed hygiene and freshness. Read on to know exactly how often to wash your linens and when to change other bedding to preserve their freshness.

How Often to Wash Your Sheets

Alright, ideally, you want to wash your sheets once a week. While this can be daunting at first, it’s one-hundred percent doable. Incorporate changing your sheets to your weekly cleaning schedule, or try to have additional sheets on hand to swap your sheets every week.

However, how often you wash your linens depends on many things. For example, if you travel a lot and don’t sleep on your bed every night, you can probably wash your sheets every two weeks. On the flip side, if you tend to sweat a lot overnight or sleep with your pet, your sheets get dirtier faster. In this case, you should change your bedsheets every three to four days.

How Often to Wash Other Bedding

Of course, your linens include much more than your bedsheets. You have to worry about blankets, comforters, mattresses and mattress protectors, and so forth. Since these have different uses and exposure to dirt and grime, they also change how often you wash them.

Pillowcases, for example, need to be washed once a week or even more often. If you

For example, blankets, comforters, and pillows should be washed about once per season. However, between washes, tossing them in the dryer for 15 minutes every month can help get rid of any dust mites accumulated. Pillows should be washed or changed once or twice per year, depending on the grime they accumulate.

Lastly, if you use a mattress protector, you should try to wash this every two months. Mattress protectors are there for a reason. So, if anyone has an accident or a spill, you should immediately wash it to prevent any stains.

Geraldine Orentas is a writer from Happy Writers, Co. in partnership with Italian linen retailer, Linoto.


Bluegrass Company
https://www.google.com/maps?cid=1536571363059009812
3323 Wood Valley Ct, Lexington, KY 40502
(859) 888-1515
http://155.138.213.92/

Cleaning Tips & Tricks, linens, odor removal, spot cleaning, spot removal, stain removal, stains, washing

A Guide to Cleaning Outdoor Areas of Your Home

With the outdoor spaces around your home consistently exposed to the elements, you might have a tougher time keeping them spotless. Wind can blow dust and debris into every nook surrounding your home, rain can leave unsightly marks on certain surfaces, and it goes without saying that fall creates havoc with leaves and tree branches!

Not to worry: We’re here to help you have an easier time cleaning the outdoor areas of your home!

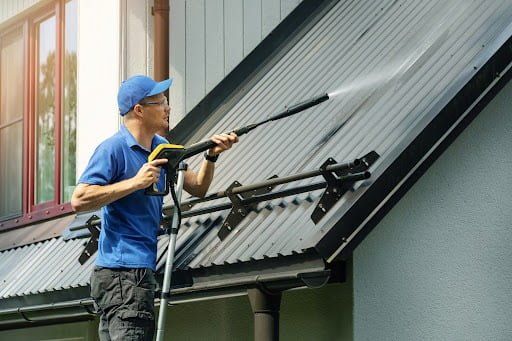
  • Start from the top. As is the rule inside your home, you should also clean your outdoor areas from top to bottom. Take a ladder and check your roof for any debris. You’re like You’re likely to find plenty of leaves and sticks. Remove leaves with a leaf blower and use a low-pressure washer to remove other debris. You may not want to use high-pressure water to clean your roof without professional assistance, as this could damage your shingles or tiles.
  • As well as cleaning scattered debris laying on your roof, it is crucial to keep your gutters in order. Grab a trowel, put on some gloves, and remove any material inside your gutter. Then, rinse them out with a hose. Be sure to start at the opposite end to the downspout!
  • Clean your siding. If you have vinyl cladding, this is easy to clean with a mixture of water and white vinegar. Simply use a low-pressure washer to prepare the surface, before applying your cleaning mixture and removing dirt with a soft-bristled brush.
  • Here are two handy tips for cleaning your siding: Cover any plants, flowers, or ornaments that you wish to keep away from your cleaning products. Also, it is recommended to clean your siding from bottom to top in order to avoid streak marks.
  • Don’t forget your windows. These can usually be cleaned with your regular dish soap, followed by a soft brush and a wipe with a glass-cleaning product to dry them down.
  • Look out for the little things. You will quite rightly place plenty of focus on the outdoor areas of your house – but what about the rest of your yard? Check your outdoor chairs and their cushions for any areas that need cleaning with a vacuum or sponge. If needed, remove your cushion covers and wash them according to their instructions. Check any light fixtures for signs of dust or dirt.
  • Retouch your outdoor furniture. Do you have any wrought iron, aluminum, or wicker furniture? Give them a quick once-over with a hose and brush before applying a new layer of paint or sealant, if necessary.
  • Take a pressure washer to hard surfaces. Your patio and driveway might need a little extra love if they haven’t been washed for a while. Get a high-pressure jet washer and spray the grime away from these hard, outdoor surfaces.

Jack Vale is a writer from Happy Writers, Co. in partnership with outdoor kitchen cabinet retailer, Werever.


Bluegrass Company
https://www.google.com/maps?cid=1536571363059009812
3323 Wood Valley Ct, Lexington, KY 40502
(859) 888-1515
http://155.138.213.92/
cleaning, Cleaning Tips & Tricks, outdoor areas

CLEANING TAGS on Your Furniture… What Do Those Codes MEAN?

Look under the cushions of a typical piece of upholstered furniture and you will usually find a fabric care tag. This tag should include an indication of the recommended procedures for maintenance and routine cleaning of that particular piece of furniture. Part of the tag will likely assure you that all new materials were used; this is a reference to the stuffing inside the piece. What you want to know more about is how to keep this piece of furniture looking its best, so look for another tag.

The Cleaning Tag

You should find a tag that specifically lists a cleaning code. Before we go into what these codes mean, please note that these tags and codes are merely a guideline to assist you in spot cleaning only. The tag is also an indication to the professional cleaner of how to avoid color loss, bleeding, browning, or shrinkage during cleaning.

Fabrics are made from a variety of fibers including cotton, polyester, silk, rayon, nylon, polypropylene, acetate, acrylic, wool, and blends thereof. They can be woven in a variety of ways, as well as having an unlimited array of dye methods, colors, and patterns. All of these different combinations make avoiding possible cleaning reactions very challenging, but possible – if you know what you’re doing!

Improper selection of cleaning agents or methods can lead to permanent damage to fabrics. An example is crushed velvet. If it is treated improperly, it can lose its softness, luster, and crimp. This sort of damage is irreversible. Many floral or multicolored patterns are printed on the fabric rather than woven into it. Extra care must be taken when cleaning these as the colors are only on the surface. The wrong chemical can actually remove the printed dyes, or destabilize them to the point that the colors run into each other. Again, this is uncorrectable.

So, effective, and safe, cleaning of your upholstered furniture means knowing how to clean it. Part of that requires deciphering the code, so here are the cleaning codes and their meanings:

W: This code tells you to spot clean only with water-based shampoo or foam upholstery cleaner. If your tag has a “W” be careful not to overwet the area or use any solvents.

S: This code tells you the opposite of “W” – it says to spot clean only with a water-free dry cleaning solvent. But remember to always pretest a small, inconspicuous area before proceeding. Be careful not to oversaturate the material or to use any water.

WS or SW: When you see this tag spot clean with upholstery shampoo, foam from a mild detergent, or mild dry cleaning solvent.

X: This is a really important one which means to clean only by vacuuming or light brushing with a non-metallic, stiff bristle brush. Never use any water or solvent-based cleaners on furniture that has this tag.

No matter what tag you see, remember these basic suggestions:

• Always clean spills promptly, calling a professional if you are in doubt.
• Never rub but rather blot up liquids to avoid damaging the fibers.
• Always start cleaning from the outside of the stain, working your way in, to avoid spreading the stain.
• Do not remove cushion covers for cleaning as they may shrink or misshape and not go back on properly.

Contact Bluegrass Cleaning Co. today for more tips, and help, or to schedule an appointment.

Bluegrass Company
https://www.google.com/maps?cid=1536571363059009812
3323 Wood Valley Ct, Lexington, KY 40502
(859) 888-1515
http://155.138.213.92/

cleaning codes, cleaning tags, Cleaning Tips & Tricks, furniture tags, spot cleaning, stain removal, stains, upholstery cleaning, upholstery codes, upholstery tags

How to Create a House Cleaning Schedule and Stick to it

New Year’s Resolutions, aren’t they great? The idea is that something new is just around the corner. The excitement of making a fresh start. Subconsciously, we all know that the list will be forgotten in about a week. Don’t worry – we are all guilty of this. Fascinating how many Sunday evening promises have been dashed by Monday mornings. The problem is that we have great expectations but do not follow through. No plan to make it work. Just like personal resolutions, tidying the house suffers from the same problems. How many household chores have been ignored until they reached the breaking point? We all know the benefits of a clean house, but sometimes it feels like we need a little something extra to keep us motivated. Let’s look at how to create a house cleaning schedule and stick to it – and we really do mean stick to it. It’s all about balance, honesty, and some organizational skills. Trust us. It’s not as difficult as it sounds. Let us wash those worries away for you.

Bigger Isn’t Always Better

Now, I am willing to get into a heated discussion with my friends over who is entitled to the biggest slice of pizza, but when it comes to problems and tasks, the smaller they are, the better. That’s the main problem – cleaning the house is no mean feat. It sounds intimidating.


But, what does it consist of? A bunch of smaller activities. You can use this to your advantage. Break up this mammoth task of cleaning your home into more manageable chunks. Go from one room to the next, take notes, make a checklist, and break it down into specific chores and activities. This will help you understand what needs to be done and realize that it isn’t so bad. A dirty carpet can seem daunting at first. But there are many ways to maintain your carpet. If you clean a spill as soon as it happens, rather than figuratively sweeping all the messes under the rug, it will be much easier!

What’s the Goal?

Ask me how I imagine my perfect home. Through some self-taught, in-built default system, I would say it needs to be sparkling clean all the time. Do I really want that, though? How about we drop the ‘sparkling’ part and stick to clean? We all have different preferences, but we must be truthful with ourselves. At the end of the day, we are the ones living in our homes.

First, we made a list of the tasks we have to perform. We need to decide how these tasks will be done, how often, and with what intensity. There is no correct answer. Choose what suits you the most. Once this has been accomplished, you should start noticing that you are becoming more comfortable with the idea of cleaning. Yes, it is an obligation, but you are taking control of this obligation.

Supplies on the Ready

You can have all the willpower in the world, but that kitchen sink cannot be scrubbed clean with the use of pure motivation alone. Plan ahead. Make sure you have all the cleaning supplies you need at all times. When you start running low, restock, and if that becomes a habit, you will never be caught off-guard. Also, make sure to keep them somewhere convenient and easily accessible and that all members of your household know where they are. This way, if an unexpected mess occurs, it can be dealt with quickly.

United We Stand

Talking about other household members, do not be shy about delegating tasks. Everybody should pull their weight. You all share the same living space, after all. It’s always easier when there are more people involved. The work is done quicker, and spreading the responsibility lowers the stress associated with such a project. Be sure to work to each other’s strengths. I hate vacuuming. If another member doesn’t mind it or even likes it (I have been told such people do exist, although I remain cautiously skeptical), it makes sense they tackle this chore while you take something more suited to you. All of this helps take away the aversion you may feel to this type of work. It helps create a house cleaning schedule that you can stick to, as it suddenly doesn’t represent an insurmountable problem.

On a side note, do not be shy to get some outside help as well. Sometimes there are some cleaning tasks that only pros can handle. These same tasks could be creating a barrier of sorts in your head. It needs to be done, but you are not sure that you can do it. Sit down, take a look at how to find the best cleaning company for you, and, once you do, give them a call. With this weight lifted, it will make the remaining chores easier. Maybe that carpet from earlier is giving you a headache? You could employ the services of professional carpet cleaners from Lexington, KY, to remove those stains, along with your worries, in a jiffy. Just a thought.


Want to Create a House Cleaning Schedule and Stick to It? Reward Yourself!

A simple psychological trick, but it works. Give yourself a treat for sticking to the schedule. Oh no, the oven needs to be cleaned. Oh yes, I will go out to that new restaurant my friends have been raving about for ages. It makes the work easier, as you know there is something good waiting for you at the end of it all. What about an audiobook or some music? These can make the work easier in real-time. We tend to think that we cannot have fun when we work, as if these two are mutually exclusive. Through these seemingly obvious tricks, you can increase the chances that you will adhere to that house cleaning schedule you had so meticulously put together.

Once the Planning is Done

If you followed all of the steps above, you should have a good schedule that, ideally, will be somewhere that everyone can see. On the fridge or the front door, as a silent reminder of what needs to be done each day. When it comes to cleaning the home, everyone has their style. Still, there are always helpful pieces of advice that you can pick up along the way. Spring cleaning can be tricky, but if you want to clean your place from top to bottom, applying a few tips from the pros can help. If there is one thing we hope you have picked up from this article, it’s that nothing is as hard as it may seem at first glance.

Clean Home, Happy Home

This is the final step. Are you ready? After you have done all of the above, it is time for you to finally enjoy the fruits of your labor. You should now know how to create a house cleaning schedule and stick to it. Once you do it, you will realize it was not as tricky as it seemed. It’s all about realistic goals and a relaxed and systematic approach to solving this problem. Now, about those New Year’s Resolutions…


Bluegrass Company
https://www.google.com/maps?cid=1536571363059009812
3323 Wood Valley Ct, Lexington, KY 40502
(859) 888-1515
http://155.138.213.92/

cleaning plan, cleaning schedule, house cleaning schedule, house upkeep plan

7 Tips for The Last-Minute Mover: Self Storage, Professional Movers, and More

It is common knowledge that moving houses is one of the most stressful things a person can do. Hence, it is important that you take the time to plan the entire process. It doesn’t always have to be that difficult, though! In fact, there are many things you can do to be able to successfully move without having to spend many hours planning it out!

Below, you will find some of the most important tips to remember in order to make a house move easy, no matter how much time you have before moving day!

What Do I Do When I Have To Move Houses On Short Notice?

Here are some tips to remember when moving houses on short notice.

Identify Your Necessities And Pack Them Up First

One of the most difficult parts of moving is the packing process that comes before the actual move. After all, you will need to take a few days to make sure you have everything packed up and ready to go. However, there is an easier approach that may just work out for you!

When packing up your necessities, it is best to start with items that are fragile and breakable. This will help you avoid any damage in the process of moving them from one place to another. After identifying what should be packed first, pack everything into boxes as quickly and efficiently as possible. It would also be a good idea to pack up a few of your favorite things to help make the transition back into the new home more pleasant.

Temporarily Move Everything Else Into Self Storage

Once you have sorted out your necessities, you may look into putting them in self-storage for the meantime. This will make the move much easier, and it will take less time because you won’t have to go through all your items all at once.

Instead, you can sort through your stuff and declutter as necessary while you settle into your new place at the same time. That means you won’t have to worry about making hasty decisions and regret giving anything up immediately. That also means you won’t have to deal with unpacking your items in bulk! Instead, you can take your time with it and only move your stuff into the new place as you need them.

A self-storage unit will provide you with a convenient place to store your items and offer security and protection. You can choose from different types of storage facilities- either climate controlled or regular, depending on what is best for the material of your goods.

The Self Storage Association, a trade organization for self-storage in the United States also upholds its members to high standards of service, which means you can rest assured knowing your belongings are safe and secure in your chosen facility.

If you’re worried about the costs, you don’t have to be! According to WhatStorage, a website that connects users with the best self-storage companies in Nottingham, London, and several other cities in the UK, a good majority of self-storage facilities offer month-to-month contracts. That means you only pay for the time your items are in storage and not a year’s worth of rent upfront!

The best part? Self-storage costs are computed based on factors surrounding your storage needs (e.g., size of the unit, type of unit, length of stay, and location), thus ensuring you pay a fair amount.

Employ The Help Of A Moving Company

If you’re looking for a little outside assistance to make your move easier, it would be best if you hire the help of a moving company. They have employees that specialize in packing and carrying all those heavy items and knowing what is needed when it comes to loading certain goods onto their trucks.

With an expert’s help, you also won’t have to worry about being unable to pack up and move out in the short period you had allotted for the move. Furthermore, they can also help you store your items in a storage facility if need be.

Ensure Utilities Are Running At The New Place

Once you’ve finally managed to move in, make sure that the utilities (power, water, and gas) are running at your new place. This is a crucial step because you won’t be able to use any of the appliances or fixtures in your home without it.

So, be sure to call the utility companies concerned before moving day. That way, you won’t have to spend your first few nights in the dark without heating or water!

Hire Professionals To Clean Out Your Old Place

It is a good idea to hire professionals to clean out your old house before you move in. This will help eliminate any pests, germs, and odors that may have been present and make the home more appealing when it comes time for viewing potential buyers.

If you are moving into a property that has been previously occupied, you can also have professionals come in and clean out the old place for you. This ensures that you are moving into a clean home that has been sanitized for your comfort. There are also several Health Benefits To A Clean Home. This includes improved mental health, less risk for respiratory diseases, better sleep, a more active lifestyle, and man more.

Get Friends And Family To Help You Out

While most moving companies will be able to handle your move without a problem, having some friends and family over to help you out can make the process so much quicker. This is because there will be more people working to get you all packed up and moved out!

Do remember, though, that you will want to ask for the help of people who are physically capable of lifting heavy objects and can offer an extra pair of hands. After all, you don’t want to have an injured family member on your hands.

Have A Plan For Your Kids Or Pets On Moving Day

If you have small children or animals, it might be good to hire someone to take care of them during your move. This way, you can move around and make sure everything is running smoothly without having to worry about your kids or pets.

If you are moving to a new neighborhood or city, it might be best if your kids or pets make the move with you instead of staying at home. Not only will this give them an idea of where they’ll be living next, but it will also help ease their anxiety about being in a new place.

If you are choosing the second option, though, here are some tips you will want to keep in mind:

  • Keep your child entertained and occupied with some toys, books, or even some easy-to-handle moving tasks.
  • Always keep some snacks and drinks handy for the road. You never know when your kids are going to go thirsty or hungry, after all!
  • Make sure your pets are cool and comfortable during the drive to your new house. Putting them somewhere cramped and warm may leave them feeling uneasy and uncomfortable, which will, in turn, lead to them feeling more anxious and stressed. Here are some ways to tell if your dog is stressed.
  • Do not feed your pet big meals on moving day. Instead, feed them smaller portions more frequently to ensure they are still sated without having to worry about them getting sick or having an upset stomach throughout the day.

Final Thoughts

Now that you’ve got a plan for this quick, last-minute move, it’s time to start packing. It might seem like a lot, but remember that it’s all worth it at the end when you have a new home waiting for you!

Also, remember to relax! While moving on short notice truly is hectic and stressful, it’s always better to take the time to enjoy yourself. Trust that things will turn out just fine.

Meanwhile, if you are planning on making some changes to your new place, here are 4 Home Improvements You Should Invest In.


Bluegrass Company
https://www.google.com/maps?cid=1536571363059009812
3323 Wood Valley Ct, Lexington, KY 40502
(859) 888-1515
http://155.138.213.92/

Carpet Wrinkles, Ripples & Buckles

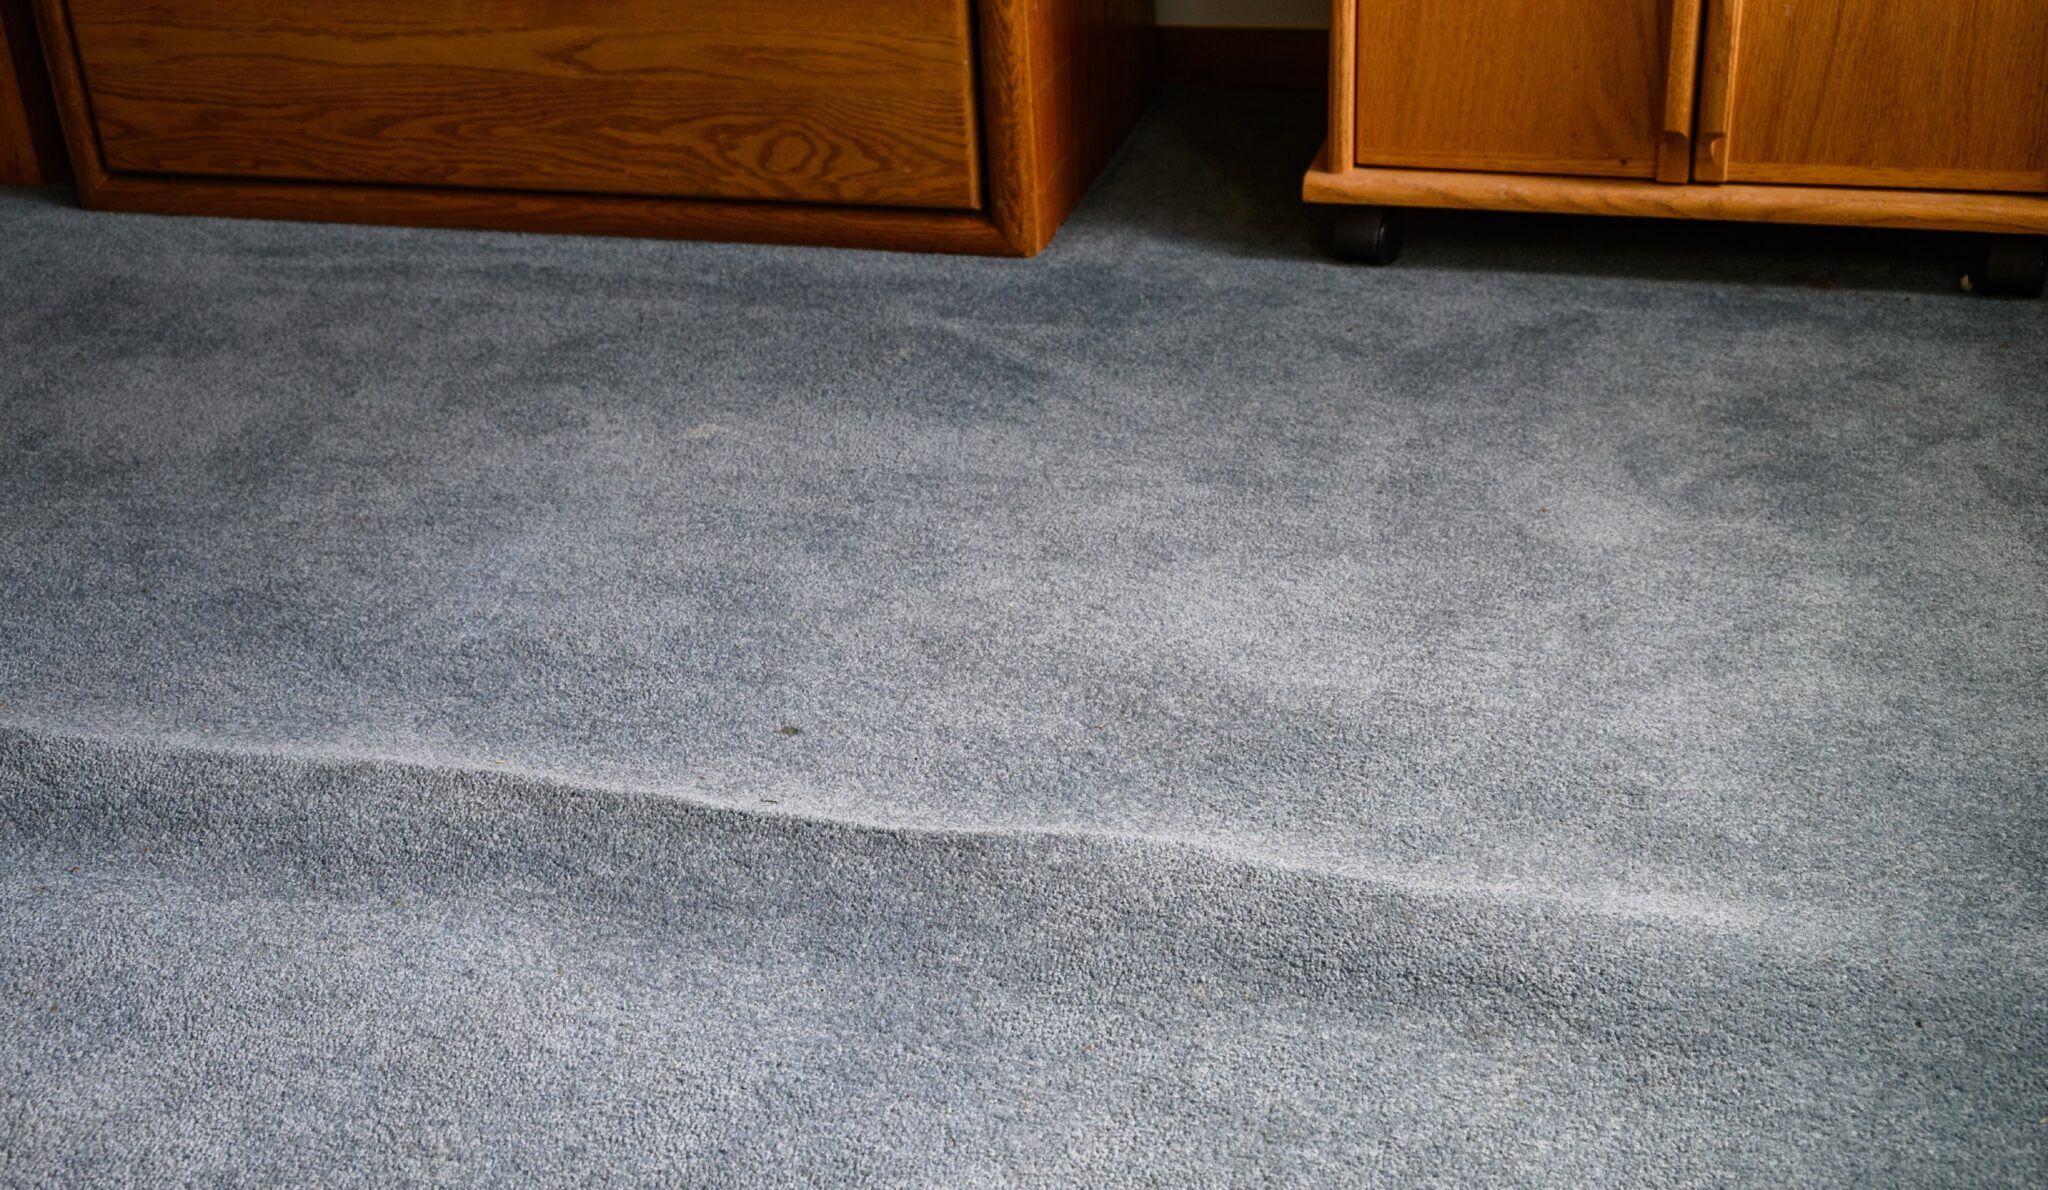
Carpet wrinkles and buckles can happen to old carpets, and new carpets, in high-traffic areas, and in low-traffic areas. These ripples not only look terrible but can cause dangerous tripping hazards. Since this unsightly phenomenon can happen at any time during the life of your carpet, even when it is new, prevention is the best medicine.

Ripples Happen

Ripples can occur throughout the life of a carpet. Ripples are small waves that usually appear sometime after the carpet is installed. They can happen in a localized area or throughout the entire room. Installer error is the most common cause. Though ripples can also develop from excessive rolling traffic, improper carpet cushion, delamination of the primary and secondary backings, and even some manufacturing defects.

To avoid ripples carpet should be installed using a power stretcher. Too often installers save time by using a knee-kicker. This results in an inadequate stretch and the potential for ripples to develop as the carpet relaxes. Ripples also occur to carpet that is not properly acclimated to the environment prior to installation, especially if the carpet is installed in cold weather. A carpet needs to acclimate to a normal room temperature and humidity for at least 48 hours before installation.

Wrinkles are Born

Wrinkles are usually seen in new carpets immediately after installation. Carpet wrinkles are areas where the carpet has been folded or crushed during storage. Wrinkles not only affect the surface yarns, but they also go all the way through the carpet backings and may be permanent. It is best if this condition is identified before the carpet is installed. If possible the wrinkled portion of the carpet roll should not be used. Wrinkles may be improved by steaming and grooming the carpet, but the results will vary based on the type of carpet yarn, backing, and the severity of the wrinkles.

Cleaning and Repair of Wrinkled and Rippled Carpet

Occasionally, the carpet will develop ripples immediately after cleaning. This can be quite disturbing to both the homeowner and the cleaner. The cause is moisture absorption into the adhesive layer between the primary and secondary backings of the carpet. Even though the ripples appear after cleaning, the root cause is an improper stretch of the carpet during installation. Usually, once the carpet dries completely and acclimates to the normal temperature and humidity of the home the carpet will lie flat again. This can take up to 48 hours, though in rare cases the ripples may persist. The only way to fix rippled carpet is to re-stretch the carpet. Re-stretching requires training, skill, and patience. It is more difficult to re-stretch a carpet than it is to stretch it right the first time. If ripples are ignored for too long, the carpet will develop buckles. Buckles are large ripples that form breaks and/or wrinkles through the face yarns and carpet backing. If buckles are not corrected permanent damage to the texture and structure of the carpet results. Even if the carpet is re-stretched the damage from buckles may still be apparent.

So what should you do if your carpet develops ripples? If the carpet is still under warranty, it’s best to contact the installer and the retailer where you purchased the carpet. If you don’t get any help there the manufacturer would be the next logical step. You may have to be persistent and patient to get results, so keep track of names, dates, and times of all calls or e-mails. If your carpet is out of warranty and has ripples or buckles, steaming and grooming the pile yarns may help minimize the appearance of the damage. Contact Bluegrass Cleaning Co. today for more tips, and help, or to schedule an appointment.


Bluegrass Company
https://www.google.com/maps?cid=1536571363059009812
3323 Wood Valley Ct, Lexington, KY 40502
(859) 888-1515
http://155.138.213.92/
carpet buckles, carpet install problems, carpet ripples, carpet wont lay down, carpet wrinkles, defective carpets

4 Home Improvements You Should Invest In

Around the country, more and more families and individuals are getting into home improvement projects. In fact, Harvard University researchers report that Americans spent nearly $420 billion on home improvement projects in 2020. This surge in home renovations is partly due to the COVID-19 pandemic, which has forced people to spend more time inside their homes and rethink their current living situations.

Home improvement projects don’t only make your home a more comfortable place to live in ⁠— they also increase the value of your house. This makes home improvement projects some of the best investments that you can make as a homeowner. In this post, we’ve listed four of the best home renovation projects you should consider undertaking and how you can finance them.

Upgrade your flooring

One of the best upgrades that you can install in your home is hardwood flooring. Using this kind of flooring in common areas can increase the resale value of your home as it is durable, attractive, and goes well with just about any home aesthetic. But if you’re looking for some flooring that works best for families with young children, it might be worth sticking to carpets. The great thing about carpet flooring is that they are easy on young knees and elbows, and you can even choose stain-resistant options if you’re worried about spills.

Update the look of your bathroom

A bathroom remodeling project can give you a huge ROI. However, bathroom renovation projects can often be costly. Thankfully, you don’t need to turn it inside out to increase the overall value of your home. Something as simple as replacing the fixtures, tiling, and vanity can go a long way. By modernizing your bathroom through simple adjustments, you can make it look more inviting to potential buyers.

Finish out your basement

If you want extra space in your home, finishing your basement may be a good idea. While this home improvement project can set you back thousands of dollars, the money you spend is well worth it — since you increase both the usable living space in your home and its market value. If you choose to finish your basement, you can expect a return of at least 70% on your investment. This means that if you spend $10,000 on your basement, it can potentially increase the value of your property by about $7,000.

Remodel your kitchen

Remodeling your kitchen can instantly boost the level of comfort in your home. After all, no one wants to prepare food in an old and dingy kitchen. What’s great about kitchen renovation projects is that you don’t have to demolish the entire space to change it. Simple upgrades such as refinishing the existing cabinets or adding a fresh coat of paint on the walls can transform your kitchen. But if you have the money to spare, going all out and changing the flooring, installing a backsplash, and buying new appliances aren’t a bad idea either.

So how can you finance your home improvement project?

As we mentioned earlier, home improvement projects don’t come cheap. Thankfully, there are many ways to finance your home improvement projects if you prefer keeping your savings for a rainy day. For starters, you can take out a home improvement loan from banks or alternative lenders. Home improvement loans are unsecured loans, so this means you won’t need to put up your other assets as collateral in order to get approved. These kinds of loans are your best bet if you have a good credit record because your lender will check your creditworthiness to determine if you’re qualified for the loan.

You can also choose to take out a home equity loan to fund your home renovation project. With this type of loan, your home acts as collateral and you will receive the money as a lump sum. A home equity loan is ideal if you prefer low and fixed interest rates. However, missing your payments means that your lender could potentially assume ownership of your home since you put it up as collateral.

Buying a home is one of the best investments that you can make in your life. If you want to make the most out of your investment, be sure to consider the home improvement projects that we’ve listed above.

Specially written for BluegrassCleaning.com

By: Roxanne Jordynn

Bluegrass Company
https://www.google.com/maps?cid=1536571363059009812
3323 Wood Valley Ct, Lexington, KY 40502
(859) 888-1515
http://155.138.213.92/